

Don’t Store Plasti Dip Like This
June 29, 2013, 7:14 pm
Filed under: Crafts
Filed under: Crafts
Don’t Store Plasti Dip Like This
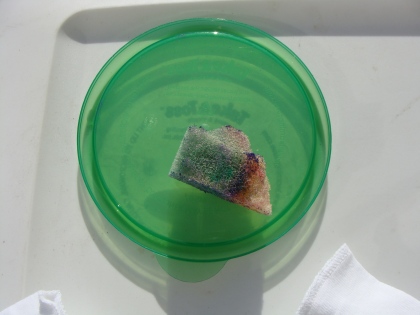
Plasti Dip is great stuff. If you don’t know what I’m talking about it’s that rubbery coating you might find on the handles of pliers. It comes in cans and you can added your own rubber coating to whatever needs it.
I got some Plasti Dip that you can tint different colors, but that means that if you have extra you will be tempted to save it for another occasion. I tinted some black last summer and then put it in an empty plastic paint pot. It seemed like a logical place and a decently good idea.
Earlier today I went to the drawer where that little paint pot of plasti dip is being kept because I have a new project for it. I was really surprised at how the plasti dip damaged the plastic paint pot. We assume that the wet plasti dip acted like a solvent dissolving the container. It’s so weird looking.

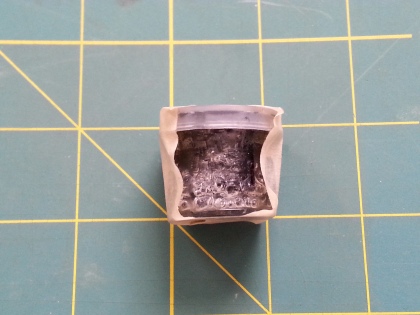

I don’t know what would be the best way to store it once you’ve mixed up some, but I do now know how NOT to store it.
Leave a comment
Make a Childs Hat on the Knitting Loom
Make a Childs Hat on the Knitting Loom
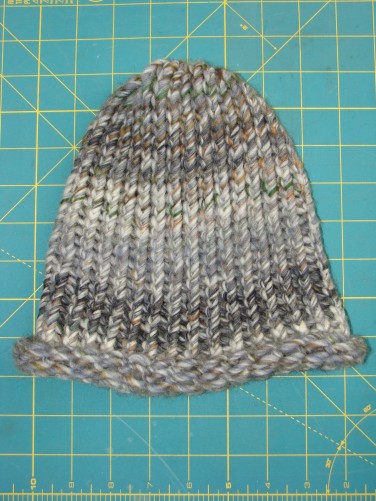
I got a set of round knitting looms recently and was working on making a leg warmer for my broken ankle that can’t tolerate many sock styles, yet. by the time i got several inches in I realized a few things: this yarn wasn’t quite right for a legwarmer, my kids were making knitting requests, and this was going to be the right size for a kid’s winter hat.
Ok, direction change. Now it’s a kid’s hat and I have just enough wool yarn to finish it.
I used some bulky (thicker than worsted weight) wool yarn and a Knitpicks knitting loom (guess the size from the picture if you want. it’s on top of a 1″x1′ grid.)

It only took a few hours of work and voila! a wool hat for the winter. The kids fight over it now…and everyone is asking for their own. 🙂
Slim Sock Choices
Slim Sock Choices
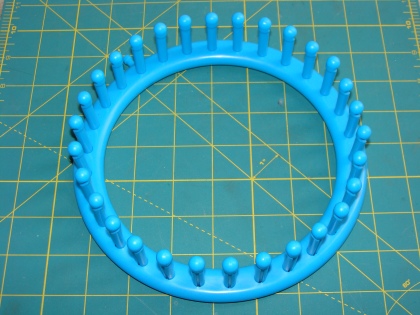
And by “slim” I mean it both as the size and as the variety of selection. My broken ankle doesn’t like most of the socks I own. I say most, but I really mean all. They are all too tight. Even the annoyingly loose pair that I used to hate because they were too annoyingly loose. Waaaaay too tight. I thought there would be a decent selection of socks since it is still February. No. I thought I could maybe get some loose leg-warmers since I’ve seen them around the past couple years. No. Nothing suitable in women’s, girls’ men’s, boys, or the athletic sections.
So what is a girl to do? I guess what I wanted might be findable on the internet or at another store in town, but I’m on crutches and I also like to feel something like this before spending my money. So I decided to knit a big loose leg-warmer on my round knitting loom. Problem solved!
Painted Wooden Barn
Painted Wooden Barn
I got this cool wooden barn for my son at Tuesday Morning last month thinking that it would match up well with the little dollhouses I got the girls. Technically it’s for the kid to paint themselves, but that’s not why I wanted him to have it. I want it to be a non-frustrating, ready to go toy for his imaginary town.
So I decided to paint it myself. If he painted it, it would look like some bad pop art or cubism, and I don’t think he’d enjoy it as much after that…because it wouldn’t look like a traditional barn. So I got out my paints and brushes and spent all morning paining this barn. I think it turned out great! I hope he loves it! I did some nice blending that I think Bob Ross would be proud of! LOL!

Homemade Wooden Toadstools
Homemade Wooden Toadstools
I made these adorable toadstools for the kids. I got some wooden drawer pulls from the wood craft section of Hobby Lobby and painted them to look like toadstools.
I have visions of fairies and tiny babies and all sorts of creatures using these toadstools in the course of play. I was afraid I would end up with mostly girly colored toadstools and tried to not do too many, but after they were all done I think I ended up with 60% neutral when only 33% of my kids are not girls. LOL! Oh well!

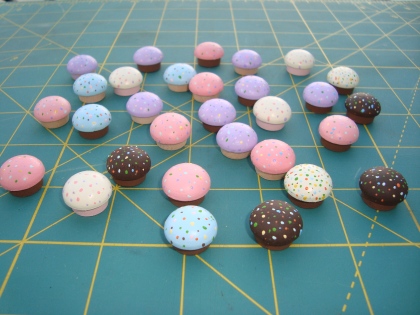
Homemade Wooden Dollhouse Cupcakes
Homemade Wooden Dollhouse Cupcakes
I made these adorable tiny cupcakes using the wooden caps that are used on furniture. I got 2 bags of caps from the wood craft section of Hobby Lobby. They were so fast and easy to make and a little addictive!
I made a few different varieties mixing the chocolate, vanilla, and strawberry “cakes” with pink, purple, cream, and brown “icing”. To top it off, literally, I used the tip of a wire to give the cupcakes multicolored sprinkles. Oh how I hope the kids like them as much as I do!
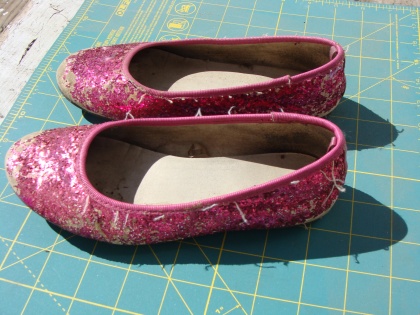
Shoe Rehabilitation
Shoe Rehabilitation
My daughter has these slip on shoes that she really likes, but they are coated with hot pink glittery stuff. After being worn by a kid for a while the glittery stuff is coming off in places and leaving behind white spots that used to be hot pink.
After they got bad enough I decided I couldn’t ignore it anymore and needed to do a little rehab on them to help them hang in a little longer without embarrassing anyone too much. So I got my sharpie that was the same color as the shoes and started coloring the white spots.
Before:
After :
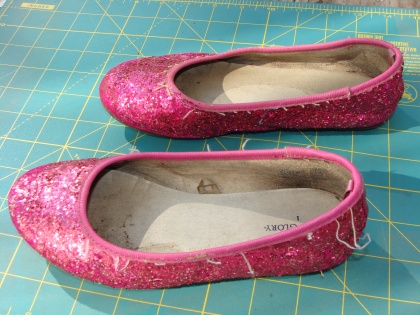
Of course I still need to cut off the dangly threads before we can call these shoes REALLY rehabilitated, but the white spots are gone. I suppose I could’ve added more glitter to the sharpie spots, but these shoes didn’t have much more time in them before they were outgrown.
Make Canvas Shoes Glittery
Make Canvas Shoes Glittery
My youngest daughter is such a girly girl. She loves all the stereotype girly things. So I decided to make her some glittery shoes.
Starting with a plain pair of white canvas shoes, fabric mod podge, fabric glitter, and a paintbrush I mixed the mod podge with the glitter. Then I painted the mixture onto the canvas part of the shoes trying to heavily coat it while still coating it evenly.
Before:

After:

She really enjoyed them and they held up well to wear and tear.
Mini Fairies
July 9, 2012, 4:26 pm
Filed under: Crafts
Filed under: Crafts
Mini Fairies
I got inspired by a friend who was making something similar for her daughters. They reminded me of the Guatemalan Worry People (aka worry dolls) that were popular when I was a kid in the 80’s. So, springboarding off of these 2 ideas I set out to make some mini fairies.
The parts are quite simple. Just pipe cleaners (silver ones for the wings), embroidery floss, and petals from artificial flowers.
I have to say that I first started on this project before Easter thinking that I could place them around the yard next to an electronic tea light and they could each have a little tiny jar of glitter aka “fairy dust”. Well, time got away from me and instead of having them ready for Spring I have just now finished all of the fairy bodies and many still need their flower clothes. Oy!

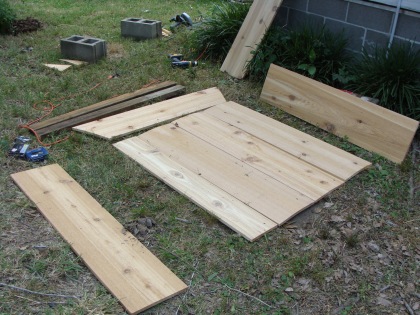
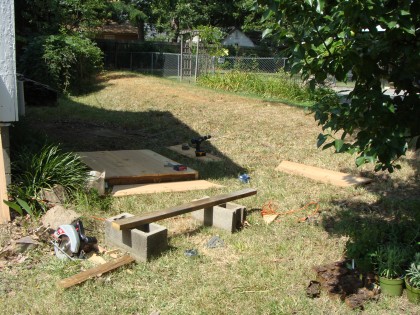
Build a Cedar Sandbox
Build a Cedar Sandbox
I ran across the plans for a really cool sandbox that had this great lid that when closed made a neat roof for the sandbox and when it’s open it makes a bench for the kids to sit on.
Spring-boarding off of that design I sat down with my pencil, paper, ruler, and big ideas. Soon I had drawn up the design for our sandbox complete with measurements and supplies list.
We chose to use 1″ cedar as the box and pressure treated 2×4’s for the foundation. I know that pressure treated wood would have worked for the whole thing, but I don’t like the idea of my kiddos getting those pressure treated chemicals all over them. So that leaves the moisture tolerant cedar. It’s not a cheap wood, but it’s not THAT outrageous.
Cutting the pieces and placing them into their general locations.
More wood cutting and assembling. The base is done in the one below.
Finished and ready for sand! We added the ropes to the base just in case we ever decided we needed to move it. It won’t go far filled with sand, but it will probably go a little bit….with a lot of muscle.

Kiddos having tons of fun!

Since it has no lid, we lay some spare wooden fence pickets across the top to keep it from being a giant litter box. LOL!
DIY Knitting Machine Repair
DIY Knitting Machine Repair
My dear knitting machine (I personally think the term machine is misleading since it’s human powered) had 2 of the “teeth” broken off. I’m certain there’s an official name for the “teeth”, but I don’t know it. So bear with me. LOL! With this part broken it renders the thing almost useless for what I like to do. Which is blankets. Sure I could make tiny things and stay in the areas of the machine that aren’t broken, but that’s not why I got it.
After letting it sit for about a year not knowing just how to tackle the problem I showed it to my mom who mentioned popsicle sticks. Well, I have some of those hanging around. So after pulling one out and realizing that the width is almost ideal I made a plan.
I made a paper template, carefully carved out the right shape, sanded it to make it the exact right shape, super or krazy glued it in place, and held it until the glue dried. Rinse, Repeat for the second broken spot. (people don’t really rinse anything. that’s just a shampoo joke. LOL!)

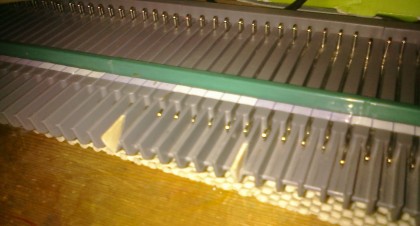
I was worried that the repair wouldn’t be strong enough to use, but after testing it out it held! Yay!
Homemade Playdoh Fun!
Nature’s Playdough
After making several batches, I’ve tweaked the instructions a bit:
I found these handy dandy little paint jars at Hobby Lobby to put my rainbow of playdoh into. Let the squishy fun begin!
Homemade Playdoh Fun!
I have been making homemade plahdoh for my kids lately. I can’t stand the smell of the store-bought kind. It’s so chemical-y. Yuck! I asked around and everyone seemed to agree that the recipe all over the internet is the one to use. It’s often called Nature’s Playdoh. It’s a super simple recipe and really easy to make quickly.

Nature’s Playdough
1 cup flour
1/2 cup salt
1 cup water
2 tablespoons oil
2 tablespoons cream of tartar
coloring (artificial food coloring or natural dyes from beets, spinach, etc)
optional scent from essential oils
After making several batches, I’ve tweaked the instructions a bit:
I have a pot of boiling water, a bowl with the dry ingredients, and a bowl with the coloring and oil (I also squeeze a couple of gelcaps of Vit E oil in for a preservative).
I scoop out the right amount of water with the measuring cup, dump the water in the oil bowl, throw the dry ingredients into the oils bowl, and stir stir stir with the backside of a large spoon (really smooshing hard on it to mix it well).
After a couple of minutes of stirring its a little cooler and I move it to the counter to knead on the tile. Voila! Playdoh!

I found these handy dandy little paint jars at Hobby Lobby to put my rainbow of playdoh into. Let the squishy fun begin!
I’ve started doing half batches so I can have more colors.

Easy Orange Pomanders
Easy Orange Pomanders
One of the things I really love about the holiday season is the smell of orange pomanders, cider, and spiced tea.
Orange pomanders are so easy to make that I usually let the kids make them each winter and do it without much guidance.

First you need an orange (we usually use a clementine aka cutie) and whole cloves. Then you push the cloves into the skin of the orange until only the clove head (the ball part) is still sticking out. You space them out fairly evenly, I usually put them a half inch apart from their neighbors.
Once all of the cloves are in it’s ready to be baked slowly on a really low temp. Essentially you’re dehydrating it and making a lot of good smell in the process. I typically use around 200 degrees for dehydrating it, but be careful to not leave it in there and then preheat the oven at 400 for dinner. Burned oranges smell terrible!
Popsicle Stick Snowflake Ornaments
Popsicle Stick Snowflake Ornaments
It’s that time of year again, time to make holiday ornaments. This year the kids decorated popsicle sticks, aka wooden craft sticks, to look like snowflakes.

I think they turned out really well and were super easy to make. First I spray painted white all of the sticks that we would be using. No way I wanted to turn this into a huge multi day painting projects with small children.

Once the sticks were painted a little dab of wood glue in the center allows you to stack 3 sticks on top of each other fanned out to look like an asterisk (*). The kids could help with this step although I did take the liberty of realigning them somewhat to make them more even.

After the glue was dry I used some glitter spray paint to give it some extra umph.


Once it was all dry we used embellishments from the scrapbook section of Hobby Lobby to decorate them.

3 ornaments made by 3 kids:
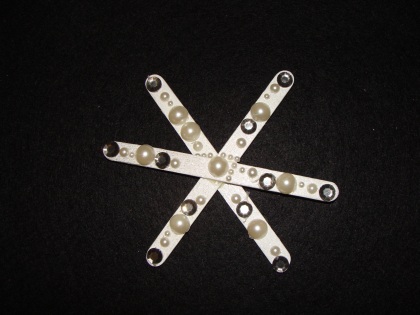
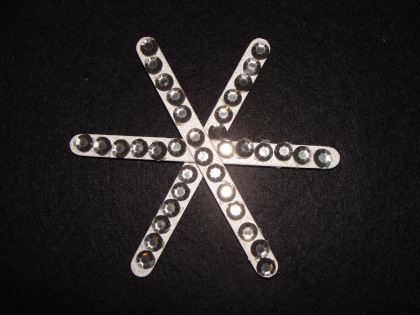
They were so easy and turned out much better than I had hoped!
Stencil “Liquid Gold” Onesies
Stencil “Liquid Gold” Onesies
I decided to make some breastfeeding related onesies to donate to my local La Leche League group.
First I printed my design and text I desired onto transparency “paper”. Then I used an exacto knife to carefully cut out the printed design to create my stencil.
Once the stencils are ready, a piece of cardboard placed inside of a plastic bag is put inside of the onesie to keep the paint from bleeding onto the backside of the onesie. The cardboard is needed to keep the stencil surface flat, and the plastic bag is needed to keep the paint from gluing the shirt to the cardboard. It is best to tape the stencil down to avoid it slipping around and losing it’s place. If you are doing multiple pieces of clothing it is important to wipe the backside of the stencil between uses. Otherwise you will transfer paint from the previous shirt onto the next one.
The design I chose was “I *heart* liquid gold” because breastmilk IS liquid gold. (Ask any mom who pumps at work just how much each hard-earned drop is worth and she’ll say more than it’s weight in gold!)

Using fabric paint and a sponge carefully sponge the paint onto the stencil and shirt. *it’s always a good thing to get your technique mastered on an old piece of fabric.*
Don’t put too much paint on your sponge or it will bleed beyond the stencil a lot. Ideally you sponge over the design a second time only a few minutes after your first coat. It seemed like this strategy eliminated a lot of the bleeding and the sticking that happens when the stencil stays in place too long.
Now you have a great new onesie for your baby to advertise it’s favorite thing!

Footprint Ghost Shirts for Halloween
Footprint Ghost Shirts for Halloween
Last Halloween my youngest was almost 1 and her daycare teachers made these fun footprint ghosts. White footprints on black construction paper. They have been one of my favorite school-made keepsakes. This Halloween we made the same thing but as shirts. I wanted to have all three of my children put a footprint on each of their shirts. We began with black tshirts and fabric paint. I mixed up a few different paints I had that included white, glow-in-the-dark, and glittery.

All of the kids took turns stamping their footprint ghost onto each of the t-shirts.

Then we added a moon and stars to each shirt with glow-in-the-dark paint.

All that is left is to draw ghost faces onto the heel part of the footprint. Easy and fun!
Making Fireworks Shirts for the 4th of July
Making Fireworks Shirts for the 4th of July
We made these fun fireworks shirts for 4th of July. The kids had a good time stamping out their individual fireworks. I must give the credit where it belongs…the idea is from Family Fun magazine. Here’s a link to their instructions: http://familyfun.go.com/crafts/fireworks-shirt-661910/
We decided to use pink shirts for the girl’s shirts and blue shirts for the boy shirts. I have to say that while the blue shirts are more 4th of July-ish, the fireworks show up so much better on the pink shirts. I dug thru my bag of fabric paints and pulled out some paints to use to create our fireworks.

We used glow in the dark, white, red, blue, green, glittery silver, glitery clear paints, and glitter.

Using pipe cleaners we made our stencils.

The instructions had you dipping the pipe cleaner stencils into paint on a plate. I found that this didn’t work very well. It required lots of paint. It caused the fuzz to sop up and hold lots of the paint; therefore, wasting it. What worked better was to draw lines of paint on the stencil, and then we lightly touched the fabric with the stencil rotating it with each touch.

Ta Da! And the kids were able to help! 🙂


Embellishing Kid’s Backpacks
Embellishing Kid’s Backpacks
I found these great small backpacks at Hobby Lobby. They’re just the right size for the kids to take to daycare instead of a diaper bag…much smaller than a standard backpack. Small enough that even my 1.5 year old can handle it. They only come in 2 colors: pink, blue. With 2 daughters and one son we ended up with 2 identical pink backpacks. Therefore, we needed a way to easily keep them separated. Daddy is, after all, the one who is doing the daycare drop-off, and we know how easliy daddies can get confused. 😉
I got some iron-on appliques of flowers, butterflies, and dragonflies to put on each of the girl’s backpacks. There were so many cute options that it was almost impossible to choose.
Plain backpack


Appliques for the backpacks


Appliques ironed onto the backpacks

Easy peasy! 😀
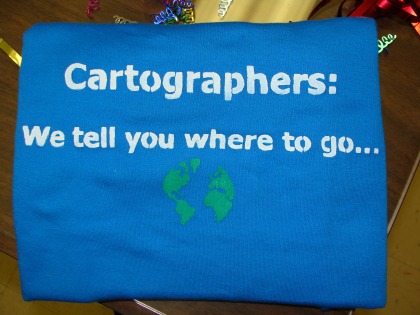
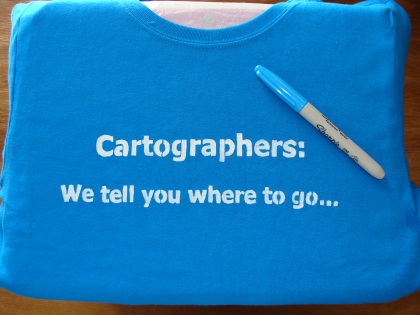
Stencil a Funny Cartographer’s Shirt
Stencil a Funny Cartographer’s Shirt
Cartographers, we have a funny sense of humor. Not everyone gets the brain of a cartographer, but we can still enjoy ourselves. My boss and friend was telling me that she wanted a shirt that says, “Cartographers: We tell you where to go…” She thought it would be a hilarious shirt. I didn’t disagree, and with her birthday approaching it seemed like a great project.
First I printed the text the size and font I desired onto clear/transparency “paper”. After it was printed I used an exacto knife to carefully cut out the letters to create my stencil. I then repeated the process on another sheet of paper for the earth stencil.
Once the stencils are ready a piece of cardboard placed inside of a plastic bag is put inside of the shirt to keep the paint from bleeding onto the backside of the shirt. The cardboard is needed to keep the stencil surface flat, and the plastic bag is needed to keep the paint from gluing the shirt to the cardboard. It is best to tape the stencil down to avoid it slipping around and losing it’s place.

Using fabric paint and a sponge carefully sponge the paint onto the stencil and shirt. If you have too much paint on your sponge it will bleed a lot. Ideally you sponge over the places a second time only 5-10 minutes after your first coat. It seemed like this strategy eliminated a lot of the bleeding and the sticking that happens when the stencil stays in place too long.


After I pulled the stencil off of this first attempt at the shirt I saw that there was some bleeding. So I got a permanent marker that was the same color ans the shirt and colored over the imperfections.
Voila! Finished product! Now she can go out and be a smart-aleck!

Making HandPrint Stepping Stones
Making HandPrint Stepping Stones
We recently had a big time making concrete stepping stones for the yard. We started with a simple kit from Hobby Lobby that was just 8 lbs of quick setting concrete. This kit will make either 1 12 in stepping stone or 2 8 in stepping stones. We decided to make the 8 in stepping stones. Along with the concrete mix we also needed molds and any decorations we would want to use on them. These also came from Hobby Lobby.

Since we were making two 8 in stepping stones we divided the concrete in half for use in two molds, making sure to not spill.


Add the water and mix the concrete thoroughly. Be careful to not splash since this is real concrete.

Smooth the concrete so it’s ready for handprints, decorations, and writing. If you end up with too much water you can use paper towels to blot the excess water from the surface. (We didn’t learn this trick until it was too late for our too wet stones.)


The son’s finished product waiting to dry.

The daughter’s finished product waiting to dry (and yes, she knows that the flowers and grass will eventually dry up).

We had a great time making stepping stones for the yard. Now I want a sea of personalized stepping stones from the kids for my yard. Good times! 🙂
Making a Heart Pillow for Valentine’s Day
Making a Heart Pillow for Valentine’s Day
For Valentine’s Day I wanted to make some heart shaped pillows for my kids. I had some spare polyester fleece fabric already laying around. So this is what I decided to use to make them. Three pillows for three kids. 2 girls and 1 boy. I started with a basic free clipart heart outline, but it wasn’t quite the shape I wanted to use. So I opened it up in a free program called IrfanView to stretch, squish, fatten, and crop my clipart heart. After I had the shape I wanted I cropped out the right half of the heart so that only the left half was left. This way I could print it on a letter sized piece of paper and have it be as big as possible. You can do the same to your own heart or you can use mine.

I printed mine on clear plastic that is like the paper they use for transparancies at schools. Then it still wasn’t quite big enough so when cutting it out I added an extra 1/4 inch for the seam allowance. Place the pattern on the fold of your fabric and cut out 2.


Putting right sides together, sew around the heart leaving about 2 inches of opening for turning and stuffing.

One of the pillows I made embellished because the oldest daughter was going to insist on the pink pillow, but the preschooler son and the toddler daughter were wild cards on which they would like best. It seems that the obvious choice for the son would be the aqua colored one, but I wanted to make no assumptions. So, I decided to embellish the neutral brown one both to jazz it up and to make it more easily swing towards a boy or a girl.
What I did was, using pinking shears, I cut out 2 small hearts from some of the pink and blue scraps. Then, I sewed them onto the right side of one of the brown pieces of fabric (before I sewed the 2 pillow pieces together).


Once the small hearts are cut out they’re ready to be put on anywhere you like. I just spaced them out in a way that was pleasing to my eye. Then sew them on to the right side of the fabric.

Here’s what it looks like from the inside once you’ve sewn it together with the right sides together.

Now clip the curves, which is basically the whole thing.


Now that the curves are clipped all that is left is turning it right side out and stuffing it.

The kids loved them!
Making Homemade Cornstarch Clay


