First Thing in the Morning
First thing in the morning…
“First thing in the morning, before you meet or greet anyone, remember to greet all of nature, all visible and invisible creatures. Say to them: “I am grateful for your work, I love you and want to be in harmony with you!” At this very moment, in response to your greeting, all of nature will open to you and send you energy for the entire day.”
~ Omraam Mikhael Aivanhov

I think you can probably tell by how looooooong my shadow is in the pic that this is at sunrise. This was taken recently on a beautiful morning out on the walking trail while I was telling nature how much I appreciate it! …and exercising! 🙂
Leave a comment
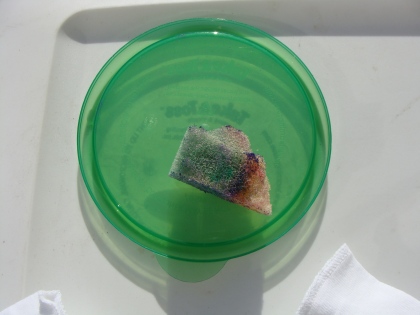
Amplify a Phone’s Speakers
Amplify a Phone’s Speakers
While outside today doing yard-work I wanted to play some music from my phone. Now, my phone has a pretty good built in speaker, but out in the yard that speaker can be over-powered by the road, neighbors, and distance.
So I found a cute flower pot I had sitting around empty. After knocking out the remaining dirt I placed my phone inside the flower pot. I should probably note that the speakers should be facing the base of the flower pot. This allows the music to bounce off the pottery sides of the pot and exit the pot amplified. Easy peasy!
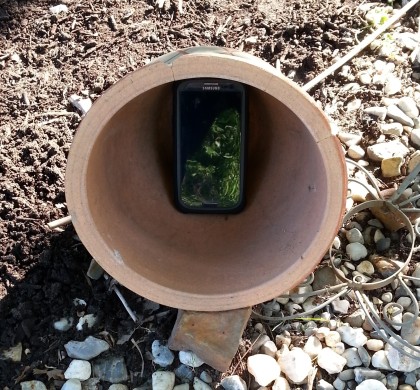

My flower pot has 2 drainage holes in the bottom. I’m sure I was losing some of my ability to amplify thru those holes, and maybe next time I’ll consider covering them, but it still worked well!
Don’t Store Plasti Dip Like This
June 29, 2013, 7:14 pm
Filed under: Crafts
Filed under: Crafts
Don’t Store Plasti Dip Like This
Plasti Dip is great stuff. If you don’t know what I’m talking about it’s that rubbery coating you might find on the handles of pliers. It comes in cans and you can added your own rubber coating to whatever needs it.
I got some Plasti Dip that you can tint different colors, but that means that if you have extra you will be tempted to save it for another occasion. I tinted some black last summer and then put it in an empty plastic paint pot. It seemed like a logical place and a decently good idea.
Earlier today I went to the drawer where that little paint pot of plasti dip is being kept because I have a new project for it. I was really surprised at how the plasti dip damaged the plastic paint pot. We assume that the wet plasti dip acted like a solvent dissolving the container. It’s so weird looking.

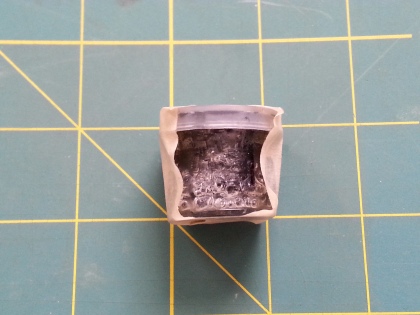

I don’t know what would be the best way to store it once you’ve mixed up some, but I do now know how NOT to store it.
Bat Box
Bat Box
Our backyard has such a bad mosquito problem. People have said that it’s because we have lots of mature trees back there. I’ve often blamed our neighbors to the back for letting water stand in large puddles in the low spots in their yard. We’ve even gone back there several times over the years to maintain little drainage channels we had dug for them. Nothing seems to help. I hate to use DEET on us, but I know it’s the only thing that REALLY works.
I, personally, skip the poison and the backyard opting to suffer any mosquito bites I will get while in the front yard. I worked as a scorekeeper at our local ballpark for years as a teenager. So I learned early on that if I could avoid scratching them, the itch would dissipate within 5-10 mins of being bitten. Not only that, there wouldn’t be a welt or bump from the bite.
However, I want to enjoy our backyard without being coated in poison or worrying about getting bit a million and twelve times. Did you know that bats eat a lot of mosquitoes each night?! I didn’t realize either! So I looked up plans for homemade bat boxes, but being impatient and wanting to get going on a potential solution immediately I also bought one. It’s pretty basic, but if bats house in it that will be fantastic!
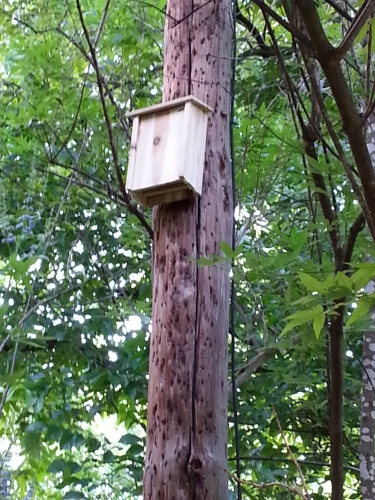
There’s an old power pole on our property line next to the backyard that was just begging to have a bat box. The instructions say it could take up to a year and a half for bats to make a home in it. I’m taking the “build it and they will come” approach. 🙂

So it won’t be immediate gratification, and may not even be helpful for this summer, but hopefully we’ll be enjoying our backyard more by the end of next summer.
I’m thinking I need to add a couple more…just in case.
Bike Maintenance
Bike Maintenance
In our family we have a tendency to repair rather than replace our things. Which leads others to offer us their old and or broken things. Since we don’t like to waste and have repair skills, we usually accept their old and broken things. (which is part of why I have too little space in my house and sheds, yes, more than one shed.)
A friend who has 3 sons all within a year of each other (twins and a singleton) passed down their 3 most recently outgrown bikes. Being the former bikes of 9-10 yr old boys you can imagine they’ve seen their days of wear and tear.

We have this thing we do called frankensteining where we take the good/working parts from like items and put them all together to make one item that’s as best as it can be with the parts available. The bikes were no exception. First find the best frame with the best brakes attached. Then swap out parts so that it has the best seat, tires, chain, and handle grips from the three bikes.

And after you’ve fixed what the kids did when they were “helping” you do the repairs, it’s ready to ride! A freshly rehabbed bike!
Happy Pi Day!
March 14, 2013, 9:20 pm
Filed under: Cooking
Filed under: Cooking
Happy Pi Day!
Happy Pi Day to everyone! I hope you had some pie! I did.
We cooked up a frozen berry pie we had on hand. 🙂 A Marie Callenders Razzleberry Pie to be exact. None of the dairy and red dye #40 that my family can’t have. Good stuff!
Also, I find it surprising that my very nerdly husband had no clue what I meant when I started talking about Pi Day. He thought I meant it was a day to cook pie because I had a craving for pie.
Then, as I explained each part, it dawned on him so slowly that I could literally see the gears in his brain turning. LOL! Pi… 3.14 … March 14th … 3-14 … circles … pies … pies are circles … pie sound like Pi ….. Ahhhhhhhhhhhh!
Make a Childs Hat on the Knitting Loom
Make a Childs Hat on the Knitting Loom
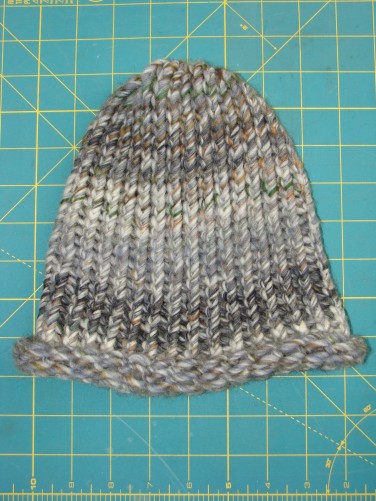
I got a set of round knitting looms recently and was working on making a leg warmer for my broken ankle that can’t tolerate many sock styles, yet. by the time i got several inches in I realized a few things: this yarn wasn’t quite right for a legwarmer, my kids were making knitting requests, and this was going to be the right size for a kid’s winter hat.
Ok, direction change. Now it’s a kid’s hat and I have just enough wool yarn to finish it.
I used some bulky (thicker than worsted weight) wool yarn and a Knitpicks knitting loom (guess the size from the picture if you want. it’s on top of a 1″x1′ grid.)

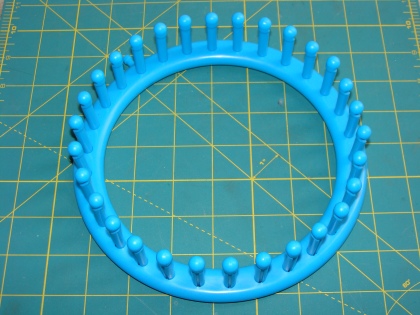
It only took a few hours of work and voila! a wool hat for the winter. The kids fight over it now…and everyone is asking for their own. 🙂
Slim Sock Choices
Slim Sock Choices
And by “slim” I mean it both as the size and as the variety of selection. My broken ankle doesn’t like most of the socks I own. I say most, but I really mean all. They are all too tight. Even the annoyingly loose pair that I used to hate because they were too annoyingly loose. Waaaaay too tight. I thought there would be a decent selection of socks since it is still February. No. I thought I could maybe get some loose leg-warmers since I’ve seen them around the past couple years. No. Nothing suitable in women’s, girls’ men’s, boys, or the athletic sections.
So what is a girl to do? I guess what I wanted might be findable on the internet or at another store in town, but I’m on crutches and I also like to feel something like this before spending my money. So I decided to knit a big loose leg-warmer on my round knitting loom. Problem solved!
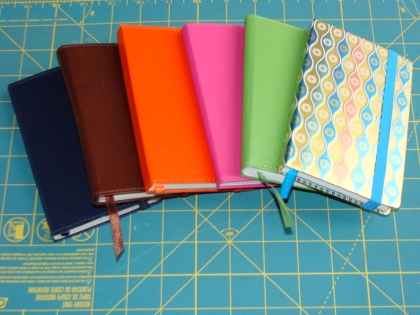
Notebook Collection
January 30, 2013, 12:34 pm
Filed under: Around the House
Filed under: Around the House
Notebook Collection
There could probably be worse things to be drawn in by and want to collect, but I seem to have a soft spot in my heart for notebooks. Especially these pretty bound ones. I like their size. I like their colors. I like to see them all side by side looking like a notebook rainbow. They say it’s the simple things in life that make you happy. Truly, it is.
Painted Wooden Barn
Painted Wooden Barn
I got this cool wooden barn for my son at Tuesday Morning last month thinking that it would match up well with the little dollhouses I got the girls. Technically it’s for the kid to paint themselves, but that’s not why I wanted him to have it. I want it to be a non-frustrating, ready to go toy for his imaginary town.
So I decided to paint it myself. If he painted it, it would look like some bad pop art or cubism, and I don’t think he’d enjoy it as much after that…because it wouldn’t look like a traditional barn. So I got out my paints and brushes and spent all morning paining this barn. I think it turned out great! I hope he loves it! I did some nice blending that I think Bob Ross would be proud of! LOL!

Homemade Wooden Toadstools
Homemade Wooden Toadstools
I made these adorable toadstools for the kids. I got some wooden drawer pulls from the wood craft section of Hobby Lobby and painted them to look like toadstools.
I have visions of fairies and tiny babies and all sorts of creatures using these toadstools in the course of play. I was afraid I would end up with mostly girly colored toadstools and tried to not do too many, but after they were all done I think I ended up with 60% neutral when only 33% of my kids are not girls. LOL! Oh well!

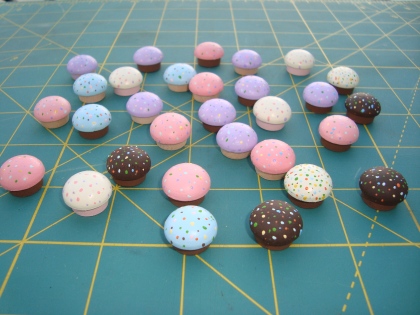
Homemade Wooden Dollhouse Cupcakes
Homemade Wooden Dollhouse Cupcakes
I made these adorable tiny cupcakes using the wooden caps that are used on furniture. I got 2 bags of caps from the wood craft section of Hobby Lobby. They were so fast and easy to make and a little addictive!
I made a few different varieties mixing the chocolate, vanilla, and strawberry “cakes” with pink, purple, cream, and brown “icing”. To top it off, literally, I used the tip of a wire to give the cupcakes multicolored sprinkles. Oh how I hope the kids like them as much as I do!
Shoe Rehabilitation
Shoe Rehabilitation
My daughter has these slip on shoes that she really likes, but they are coated with hot pink glittery stuff. After being worn by a kid for a while the glittery stuff is coming off in places and leaving behind white spots that used to be hot pink.
After they got bad enough I decided I couldn’t ignore it anymore and needed to do a little rehab on them to help them hang in a little longer without embarrassing anyone too much. So I got my sharpie that was the same color as the shoes and started coloring the white spots.
Before:
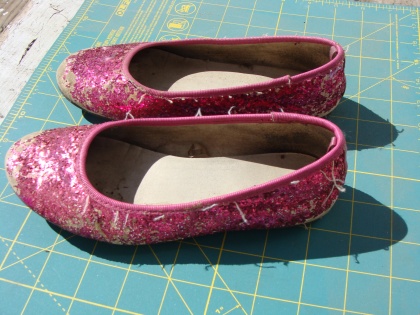
After :
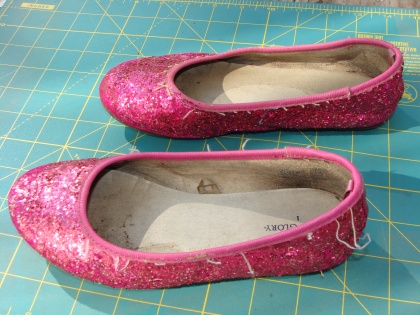
Of course I still need to cut off the dangly threads before we can call these shoes REALLY rehabilitated, but the white spots are gone. I suppose I could’ve added more glitter to the sharpie spots, but these shoes didn’t have much more time in them before they were outgrown.
Make Canvas Shoes Glittery
Make Canvas Shoes Glittery
My youngest daughter is such a girly girl. She loves all the stereotype girly things. So I decided to make her some glittery shoes.
Starting with a plain pair of white canvas shoes, fabric mod podge, fabric glitter, and a paintbrush I mixed the mod podge with the glitter. Then I painted the mixture onto the canvas part of the shoes trying to heavily coat it while still coating it evenly.
Before:

After:

She really enjoyed them and they held up well to wear and tear.
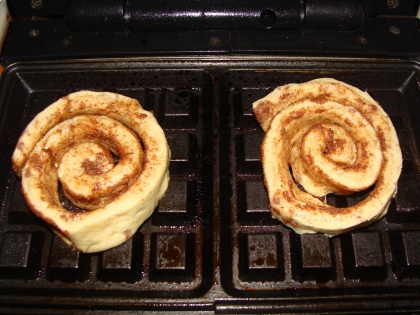
Cinnamon Roll Waffles
September 3, 2012, 10:10 am
Filed under: Cooking
Filed under: Cooking
Cinnamon Roll Waffles
While browsing the web randomly one day recently, I ran across the instructions for making cinnamon roll waffles. The original post suggested that Grands cinnamon rolls be used so that they would fill up the whole waffle reservoir. Grands has dairy and since we are dairy-free in our house we use different refrigerator cinnamon rolls.
Our waffle maker is non-stick and hasn’t caused us problems with this recipe, but the original stressed using spray oil between rolls.
I made these this morning, and I must say “YUMMY!!”
I like to loosen up the cinnamon rolls spiral so that it has room to expand as it cooks. It takes very little time to cook them, possibly even less time than a waffle, and I find that we use less than half as much frosting when we do it this way. YUM!


Adventures in Peeling Peaches
How to peel a peach (traditional instructions):
Adventures in Peeling Peaches
Last weekend and this weekend I went to a U-Pick orchard that’s nearby and picked a ton of peaches. Ok, not a ton, but it seems like it when I’m committed to preserving all of them before they spoil. Last weekend it was about 36 pounds of a white peach variety called Collins White. This weekend it was about 44 lbs of a yellow peach variety called Encore. 80 lbs of peaches! Just what exactly was I thinking!?!?
I have yet to fully determine why, but all peach canning recipes call for peeling the peaches. This goes against my sensibilities since I don’t peel raw peaches when I eat them and my mom always taught me that the most fiber and lots of nutrients was in the skin. Now my husband and I have had the great skin struggle for the last 17.5 years. He likes things peeled; I don’t. Back to the peeled peaches situation. All I have been able to determine is that maybe the skins will make your canned peaches taste bitter, but I’m not even certain this is the real reason for peeling peaches before canning. Nonetheless, I’m peeling these peaches and trying to act like the husband didn’t win the great skin debate…after all, I’m just following a recipe as opposed to doing what he wanted. LOL!
The instructions for easily peeling peaches is all over the place. Cookbooks, canning recipes, the internet, etc. It sounds like a breeze on paper. ON PAPER! It has a definite learning curve. I thought it would be a breeze. After 2 full weekends of working on it, I am starting to get a system.
How to peel a peach (traditional instructions):
Drop peach into boiling water for 30-60 seconds. Immediately move it to ice water. Slip peel off.
Sounds easy right?!?!
Eh, I found there was more to it than just that. When it says boiling water they mean a rolling boil. Not a simmer. Not an almost rolling boil. Make sure the WHOLE peach is covered with water. If a little edge is exposed the skin won’t slip off and you will be using a knife for that spot. When they say ice water they don’t mean cold water. It needs to be serious ice water and changed out after every couple of peaches so it stays ice cold. Finally, the peach shouldn’t stay in the ice water until it’s cooled off. It needs to be in there maybe 5 seconds so it’s just cool enough to touch. If you do all these things the right way the skin might even slip off while you’re trying to pick it up out of the ice water. Otherwise, you’re going to be cutting off a lot of skin and losing a lot of flesh in the process.
One extra thing I am doing is cutting the peach in half before I slip the skin off. Having skin on it still makes it easier to grip when cutting. I was having the hardest time cutting them once they were skinless and slippery.
Enjoy your skinless/peeled peaches!
Homemade Peach Fried Pies
Homemade Peach Fried Pies
I know that fried pies are not the most healthy of foods, but I had a craving and needed it quenched! I started with this recipe on allrecipes http://allrecipes.com/Recipe/Apricot-and-Peach-Fried-Pies/
A screenshot of the recipe:

I really only used the part of the recipe that tells how to make the crust and then used pie filling for the insides. One batch I used canned pie filling and another batch I used a homemade concoction of freshly picked peaches from our local u-pick orchard. They both turned out great, but try finding canned pie filling that doesn’t have high fructose corn syrup or artificial colors in it. It’s quite hard!
Of course, it wouldn’t be one of my concoctions if I didn’t go fiddling with the ingredients. So the shortening used was the trans-fat free organic version from Spectrum. Then since my family has so many lactose intolerant people we subbed Rice Dream Organic rice milk, original flavor, for the cow’s milk. It tasted normal and not weird like some might worry. LOL!
I rolled out the dough into circles using a homemade french rolling pin. Placed a blob of peach filling in the middle and closed it over. My preference was to leave the bottom crust hanging past the top crust so that the bottom could be wrapped up around the top edge and crimped. this seemed to keep the filling inside better.

Then it’s time to cook them. I used canola oil (since it has a fairly high smoke temp to keep the carcinogens at bay) in my iron skillet. I’ll point out that it isn’t deep fried completely submersed in oil. It only takes a layer on the bottom. Probably no more than 1/4 inch of oil. It may take some trial and error to get the right temperature.

When they’re nicely golden brown and you feel they look yummy, take them out and place them on a plate with a paper towel to absorb the excess oil.
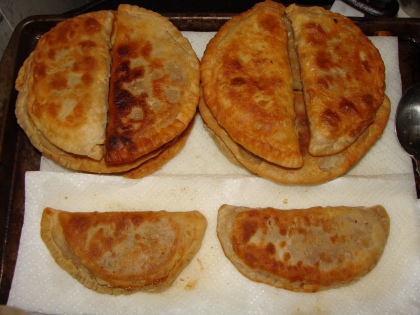
Once they’ve cooled enough to not burn your mouth with the pie filling they’re ready to eat! YUM!

Mini Fairies
July 9, 2012, 4:26 pm
Filed under: Crafts
Filed under: Crafts
Mini Fairies
I got inspired by a friend who was making something similar for her daughters. They reminded me of the Guatemalan Worry People (aka worry dolls) that were popular when I was a kid in the 80’s. So, springboarding off of these 2 ideas I set out to make some mini fairies.
The parts are quite simple. Just pipe cleaners (silver ones for the wings), embroidery floss, and petals from artificial flowers.
I have to say that I first started on this project before Easter thinking that I could place them around the yard next to an electronic tea light and they could each have a little tiny jar of glitter aka “fairy dust”. Well, time got away from me and instead of having them ready for Spring I have just now finished all of the fairy bodies and many still need their flower clothes. Oy!

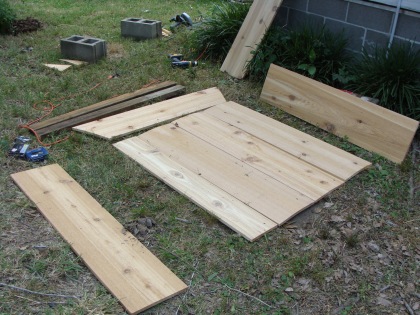
Build a Cedar Sandbox
Build a Cedar Sandbox
I ran across the plans for a really cool sandbox that had this great lid that when closed made a neat roof for the sandbox and when it’s open it makes a bench for the kids to sit on.
Spring-boarding off of that design I sat down with my pencil, paper, ruler, and big ideas. Soon I had drawn up the design for our sandbox complete with measurements and supplies list.
We chose to use 1″ cedar as the box and pressure treated 2×4’s for the foundation. I know that pressure treated wood would have worked for the whole thing, but I don’t like the idea of my kiddos getting those pressure treated chemicals all over them. So that leaves the moisture tolerant cedar. It’s not a cheap wood, but it’s not THAT outrageous.
Cutting the pieces and placing them into their general locations.
More wood cutting and assembling. The base is done in the one below.
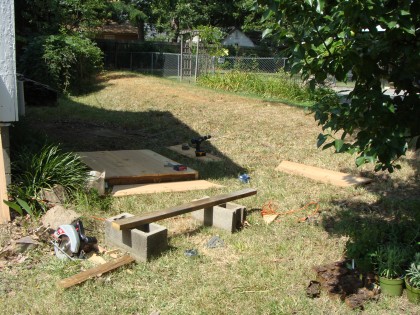
Finished and ready for sand! We added the ropes to the base just in case we ever decided we needed to move it. It won’t go far filled with sand, but it will probably go a little bit….with a lot of muscle.

Kiddos having tons of fun!

Since it has no lid, we lay some spare wooden fence pickets across the top to keep it from being a giant litter box. LOL!
DIY Knitting Machine Repair
DIY Knitting Machine Repair
My dear knitting machine (I personally think the term machine is misleading since it’s human powered) had 2 of the “teeth” broken off. I’m certain there’s an official name for the “teeth”, but I don’t know it. So bear with me. LOL! With this part broken it renders the thing almost useless for what I like to do. Which is blankets. Sure I could make tiny things and stay in the areas of the machine that aren’t broken, but that’s not why I got it.
After letting it sit for about a year not knowing just how to tackle the problem I showed it to my mom who mentioned popsicle sticks. Well, I have some of those hanging around. So after pulling one out and realizing that the width is almost ideal I made a plan.
I made a paper template, carefully carved out the right shape, sanded it to make it the exact right shape, super or krazy glued it in place, and held it until the glue dried. Rinse, Repeat for the second broken spot. (people don’t really rinse anything. that’s just a shampoo joke. LOL!)

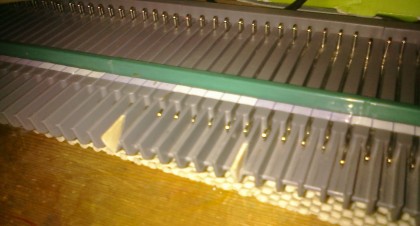
I was worried that the repair wouldn’t be strong enough to use, but after testing it out it held! Yay!
Homemade Playdoh Fun!
Nature’s Playdough
After making several batches, I’ve tweaked the instructions a bit:
I found these handy dandy little paint jars at Hobby Lobby to put my rainbow of playdoh into. Let the squishy fun begin!
Homemade Playdoh Fun!
I have been making homemade plahdoh for my kids lately. I can’t stand the smell of the store-bought kind. It’s so chemical-y. Yuck! I asked around and everyone seemed to agree that the recipe all over the internet is the one to use. It’s often called Nature’s Playdoh. It’s a super simple recipe and really easy to make quickly.

Nature’s Playdough
1 cup flour
1/2 cup salt
1 cup water
2 tablespoons oil
2 tablespoons cream of tartar
coloring (artificial food coloring or natural dyes from beets, spinach, etc)
optional scent from essential oils
After making several batches, I’ve tweaked the instructions a bit:
I have a pot of boiling water, a bowl with the dry ingredients, and a bowl with the coloring and oil (I also squeeze a couple of gelcaps of Vit E oil in for a preservative).
I scoop out the right amount of water with the measuring cup, dump the water in the oil bowl, throw the dry ingredients into the oils bowl, and stir stir stir with the backside of a large spoon (really smooshing hard on it to mix it well).
After a couple of minutes of stirring its a little cooler and I move it to the counter to knead on the tile. Voila! Playdoh!

I found these handy dandy little paint jars at Hobby Lobby to put my rainbow of playdoh into. Let the squishy fun begin!
I’ve started doing half batches so I can have more colors.

Easy Orange Pomanders
Easy Orange Pomanders
One of the things I really love about the holiday season is the smell of orange pomanders, cider, and spiced tea.
Orange pomanders are so easy to make that I usually let the kids make them each winter and do it without much guidance.

First you need an orange (we usually use a clementine aka cutie) and whole cloves. Then you push the cloves into the skin of the orange until only the clove head (the ball part) is still sticking out. You space them out fairly evenly, I usually put them a half inch apart from their neighbors.
Once all of the cloves are in it’s ready to be baked slowly on a really low temp. Essentially you’re dehydrating it and making a lot of good smell in the process. I typically use around 200 degrees for dehydrating it, but be careful to not leave it in there and then preheat the oven at 400 for dinner. Burned oranges smell terrible!
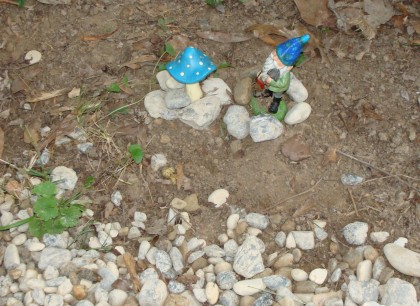
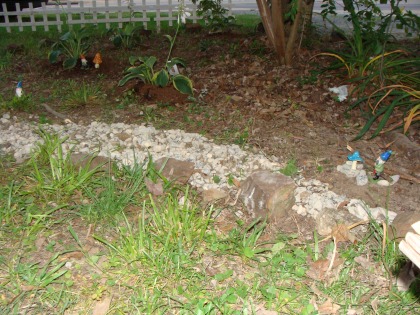
Garden Gnome Fun
Garden Gnome Fun
Alright, I know that garden gnomes have a bad wrap and are considered lame or for old ladies. BUT we watched the kids movie Gnomeo and Juliet. It was pretty cute and put a new spin on my point of view for gnomes.

So I became a gnome fan! LOL! Who would’ve guessed?! Although I like the small, not very noticeable ones vs the big ones you could see from the street. The family has had some good fun placing the gnomes in our garden. They have plant, dirt, and rock areas to set up house in. So hopefully the gnomes won’t be bored with just one type of terrain. 🙂
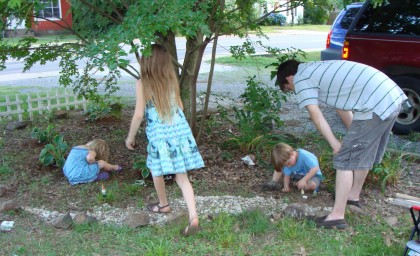 The family thoughtfully places the gnomes in their new homes.
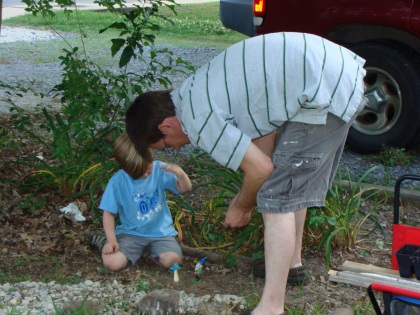 Finding just the right home for a gnome can be serious business.

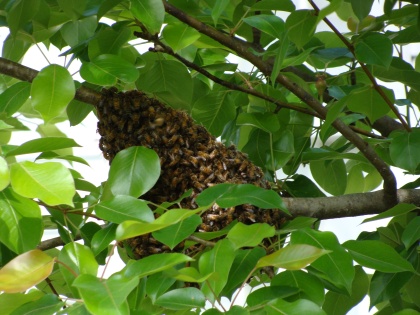
A Bee Swarm
A Bee Swarm
Today I spotted a bee swarm in our pear tree. I have never seen one in person before; so, this was a real treat for me. I took these pictures and tried to decide what I could use to hold the swarm if I decided to attempt to keep it. We don’t have a bee box but my father in law does. I was contemplating what to do while taking the camera back inside only to find that the swarm had already left. That was fast! Maybe this isn’t the summer to try my hand at bee keeping. LOL!


Homemade Compost Bin
The stakes are placed in the corners and the fencing is wrapped around the stakes to make the sides of a “box”. The two are secured together using the wire. *I recommend having the fencing that goes around the sides meet up in one of the front corners. This allows you to be able to detach the front wall of the box and shovel into the pile from the front.* Another section of fencing is attached to the top as a lid.
Homemade Compost Bin
I know there are a lot of plans for DIY compost bins out there. Probably many of them are much better than mine, but does what we need it to do (mostly) and is easy as pie to set up.
It is made of a roll of wire “fencing”, (the kind that is used to help house some sort of animals, maybe chickens), stakes, wire, and cinder blocks (optional). We got our materials from Lowes Home Improvement center and Home Depot.
The stakes are placed in the corners and the fencing is wrapped around the stakes to make the sides of a “box”. The two are secured together using the wire. *I recommend having the fencing that goes around the sides meet up in one of the front corners. This allows you to be able to detach the front wall of the box and shovel into the pile from the front.* Another section of fencing is attached to the top as a lid.
We eventually decided to add a layer of cinderblocks around the outside of the bottom. This had 2 benefits: keeping the sides from bowing out from the weight of the compost and making it really hard for any animals to try to dig their way under the box walls.
It’s not much to look at and it’s a simple design, but it does the trick.
The current bin:

The current bin alongside the old bin with the compost can from the kitchen waiting to be emptied:

Popsicle Stick Snowflake Ornaments
Popsicle Stick Snowflake Ornaments
It’s that time of year again, time to make holiday ornaments. This year the kids decorated popsicle sticks, aka wooden craft sticks, to look like snowflakes.

I think they turned out really well and were super easy to make. First I spray painted white all of the sticks that we would be using. No way I wanted to turn this into a huge multi day painting projects with small children.

Once the sticks were painted a little dab of wood glue in the center allows you to stack 3 sticks on top of each other fanned out to look like an asterisk (*). The kids could help with this step although I did take the liberty of realigning them somewhat to make them more even.

After the glue was dry I used some glitter spray paint to give it some extra umph.


Once it was all dry we used embellishments from the scrapbook section of Hobby Lobby to decorate them.

3 ornaments made by 3 kids:
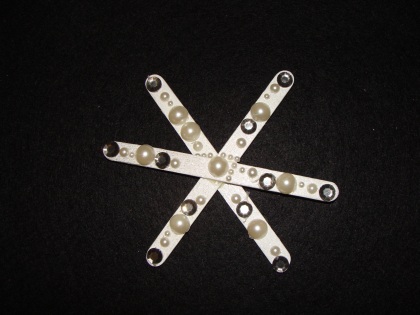
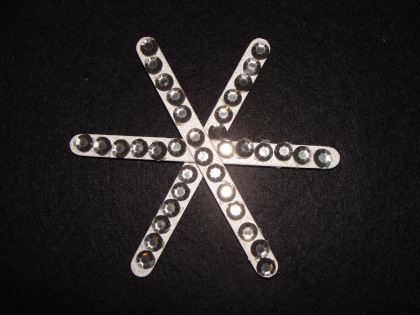
They were so easy and turned out much better than I had hoped!
Twisty Herbed Breadsticks
November 20, 2010, 5:33 pm
Filed under: Cooking
Filed under: Cooking
Twisty Herbed Breadsticks
I get this great magazine called Family Fun. It’s full of so many cute little projects and delicious recipes. The most recent copy had this recipe for bread dough and included 3 things you could do with the dough. One of the suggestions was to use the dough to create twisted herbed breadsticks. Here’s their instructions if you have time to make the dough and want to try. http://familyfun.go.com/recipes/herb-breadsticks-940408/
It looked yummy, but I didn’t really have the luxury of time to be able to make the dough. So I took the recipe as inspiration and put my own twist on it. I already had some refridgerated pizza crust dough on hand. You know, the kind in a tube. The version I used was a thin crust variety. I rolled it out onto a cookie sheet and brushed it with extra virgin olive oil.
 Brush Extra Virgin Olive Oil on Refridgerated Pizza Dough
Then I used an Italian Herb grinder and a Sea Salt grinder to season the dough.